Club Setup Instructions
StoaHub will be the main contact point for all Stoa clubs. You can only set up a club once you’re a paid member of Stoa. Stoa clubs should only be set up by club directors. Whoever sets up a club will be the official administrator for that club. You can also add more administrators.
- After you have paid your annual Stoa membership, you will have the ability to create a club. Click on “Clubs” at the top of the page and click “Create a Club.”
-
- Choose your club name. This will be the official club name that Stoa will refer to. Please make sure there are no spelling or grammatical errors. Once your club name is created, it can only be changed by StoaHub’s administrator.
-
- Enter a brief description of your club in “Club Bio”.
- Enter your main club contact email address.
- Enter the city your club meets in.
- Enter the state your club meets in.
- Enter the zip code of your club.
- Enter your country. Most will be USA.
- Enter the time zone of your club.
- Select whether your club offers speech, debate, and/or juniors.
- Enter your club website url if you have one.
- Once all the correct information has been entered, press “Create” in the bottom right corner of the screen.
-
- You’ll get a message that says, “Club created successfully.” You have been set as the club


admin.
-
- You’ll notice that your club says “PENDING” under its name. A StoaHub administrator will review the club request, and once it’s been approved, your club will be viewable to the public.
-
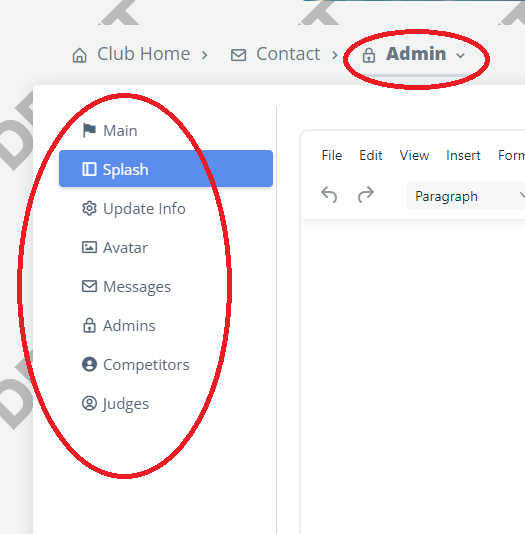
- As club administrator, you have access to the “Admin” functions.
-
- Splash is where you put more detailed information about your club that you want people to see, such as when you meet, how much you charge, etc. You can also direct people to your separate club website for more information. Enter what you would like it to be and press “Update.”
-
- Update Info allows you to change any of the information about your club except the club name. To change your club name, you must contact StoaHub administration at toolsandtab@stoausa.org.
-
- Avatar is where you can upload your club logo or a picture that represents your club.
-
- Messages is where you would see if people messaged you through StoaHub. You can reply from StoaHub, or by email.
-
- Admins show who has club administrative access on StoaHub.
-
- ‘Competitors’ is where you manage your club roster. Here, you’ll see your list of active competitors. You can add new competitors, manage pending competitors, or see denied competitors.
-
- Under “Add New Competitor”, you’ll have to make sure they have an active StoaHub account. We recommend having people request to join instead of trying to find out if the student has an account.
-
- Under “Pending Competitors,” you will see requests from students who want to be officially under your club name. Note that competitors cannot register for a tournament if they do not belong to an official Stoa club. To add a competitor, just click on “Approve.” If someone requests to join your club by mistake, you can click “Deny.”
-
- Once you approve members, they’ll show up under competitors.
-
- Under Judges, this is where you’ll see who has entered your club as a judging conflict.
-


Congratulations! You have registered your club on StoaHub!